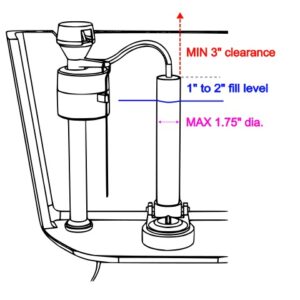
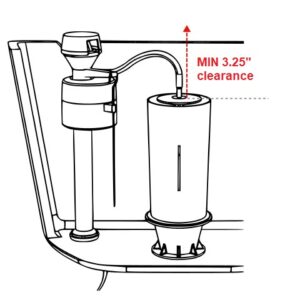
Potty Sniffer kits are available for standard tank fed toilets having a round overflow pipe or canister style (KOHLER) flush valve. Confirm which style you will need prior to purchase.
We recommend a remote sniffer pump installation whenever possible for quieter operation and to accommodate toilets with limited tank space. An in-tank pump install may be used if locating it remotely is not an option.
3/8″ OD (outside diameter) flexible PVC tubing is used for air exhaust. Standard install kits include 15′ – tubing, 15′ – low voltage power cord (speaker wire), and 15′ remote connection kit (telephone cable). Additional length may be added to the standard kits as an option from our online store. Additional tubing and cable may be purchased at your local home improvement store. Example links: Tubing Power cord Switch cable
Visit our customer install gallery for examples of prior installations to help you determine what the best option is for your own situation.
Confirm Your Required Air Intake Shroud Style
For Standard Overflow Pipe Flush Valve Toilets
- Tank water fill level set to between 1″ to 2″ below top of overflow pipe
- MIN 3″ clearance from top of overflow pipe to underside of tank lid
- MAX 1.75″ overflow pipe outer diameter at top inlet
- Compact fill valve assembly generally required for in-tank Sniffer pump installation.
Compact fill valves are available to replace older style floating bulb fill valves at your local home improvement store. Link

For Canister Flush Valve (KOHLER) Toilets
- MIN 3.75″ clearance from top of locking disk to underside of tank lid
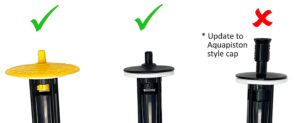
- Fits Kohler AquaPiston style (yellow) locking disk equipped flush valves with refill tubing barb connector
KOHLER repair kit #GP1229656 can be installed to replace older (black) locking disks with refill tubing socket with the AquaPiston (yellow) locking disk. Available at most large home improvement stores. Link


Sniffer Pump and Intake Shroud Dimensions
A Potty Sniffer system is compatible with most toilets where an air intake shroud can be fitted over the opening of the toilet tank overflow pipe without interfering with the operation of the toilet tank mechanisms. If needed, use an air intake shroud and Sniffer pump cutout template to verify fitment.
PDF – PS25D Sniffer Pump Dimensions
PDF – Air Intake Shroud – Standard Overflow Pipe
PDF – Air Intake Shroud – Canister (KOHLER) Flush Valve
PDF – Air Intake Shroud – Dual Flush
The air intake shroud can be oriented and positioned in the manner that best fits your toilet tank layout. A new refill tube and compact refill tube clip is included with each Potty Sniffer kit to replace the original that may not fit properly inside of the Sniffer system air intake shroud.
Exhaust Kit Install Requirements
Sink Drain Vent Saddle Kit – Install on the top side of the drain pipe and downstream of P-trap. Fits actual pipe (outside) diameter of 1-3/8″ to 1-5/8″ and up to 1-7/8″ with flex. For 1-1/4″ pipe diameter, a reducing adapter is included with the kit.
Sanitary Pipe Vent Saddle Kit – Install on the top side of horizontal pipe or on vertical pipe sections to avoid standing water and minimize exposure of the seal to moisture. The saddle fitting is designed for 3″ Schedule 40 PVC pipe (3.5″ actual OD) but will flex to accommodate down to 2″ Schedule 40 (2-3/8″ actual OD) up to 4″ Schedule 40 (4.5″ actual OD). Larger pipe clamps (than those supplied with the kit) will be required for pipe sizes larger than 3″ Schedule 40 and are available at local home improvement stores. 4″ Pipe Clamp
Through Wall Vent Kit – Standard fitting and pipe extension will accommodate up to 10″ wall thickness. The fitting may also be attached directly to 1/4″ ID (3/8″ OD) PEX pipe or 3/8″ OD flexible PVC tubing using cyanoacrylate adhesive for more thickness or to use the fitting as a wall receptacle for tubing and cable.

Required Skills And Tools
Some DIY home improvement skill will be required to install a Potty Sniffer kit. For simple installs where access to an existing electrical outlet is available you will only need to know how to use small tools and a portable drill to complete the job. An example of a simple install is a first floor bathroom directly above an unfinished basement with a nearby outlet or lamp holder fixture that can be converted to one with an outlet (Lamp holder 1 Lamp holder 2). In this case, a single 1/2″ hole through the floor directly behind the base of the toilet bowl is all that is needed for the exhaust tubing and power cable pass-through.
Installations that require tubing and wire to be routed in-wall or for a new electrical outlet to be installed will require basic electrician skills to complete.
If you do not have the necessary knowledge and experience, we recommend hiring a qualified contractor or electrician to perform the install.
The following tools are required for installation:
- Portable drill/driver
- 3/8″ drill bit
- Flathead screwdriver
- Utility knife – for cutting tubing and PEX
- Mini flathead screwdriver (<3mm flat) – for screw terminal connectors
- Wire stripper/cutter (optional) – for modifying the power cord or signal cable
- 1/2″ drill bit (optional) – for tubing + wire routing
For through wall exhaust kit installation:
- 3/8″ installer drill bit – for through wall holes
- 1/4″ drill bit – for wall anchor holes
- Phillips screwdriver
For in-wall routing of tubing and cables:
- Fishing tape
- Electrical tape – for fastening tubing + wire ends for pulling
- 1″ spade bit – for boring holes through wooden studs or drywall
